Tuesday, October 12, 2010

So Much Going On!!!


Wow, I've been to Virginia to see my son at college, taught a shawl class with some wonderful ladies at the Creative Arts Center, did a demo at Northpark Mall with the folks from the Creative Arts Center, made seems like thousands of new pieces of fabric and some new products for my upcoming shows (SAFF next week in Asheville, North Carolina (Yeah, FUN!!!) and the Houston Quilt Festival starting on November 3. I've also made some new scarf samples, finally finished the tea cozy, made a sample for the John Campbell class next May and signed up to do a demo at the Quilting Arts Booth at the Quilt Festival and to teach at the Weaving Conference in College Station next June.

No wonder I've not gotten any blogging done!!

I will post pictures as I get them uploaded!

Hope to see many of you at one of my shows!


Friday, September 10, 2010

Challenges and Blessings

You'd think I would be more tolerant of the challenges in life, as they so often lead to some new insight or something good in life. I know you know what I mean.

Here is a simple one. I was putting together some of my kits one night and cursing all of the threads that were accumulating as I tore the fabric. Those threads are all over my house -- you should see the roller on my vacuum! I stand up and pull all sorts of things along behind me.

So I get up the next morning and need to get a sample scarf done. I'd been thinking about tide pools -- printed out a cool picture and was thinking about how to get that sea weed kind of texture. Well guess what? I ran and started picking up those threads. All sorts of beautiful colors. Looked amazing.

One day cursing, next day blessing. Go figure!
Here are some pics -- I didn't get a great one of the finished scarf

Wednesday, September 1, 2010

Nuno Scarf using Power Tools (OK, I used the sander!)

I made a sample using one of my new copper scarf kits today. I tried to take pictures of all of the steps, but missed some -- I got engrossed in what I was doing. Please email if you need more info. This was a really easy project, but you need the big picture before you start -- let me know if I can fill in any blanks!
Gather your tools -- in this case I have tables which are waist high and 8' long. I've covered them with a blanket and then a plastic drop cloth. That is all you need if you are sanding your piece. I also have my room temperature water with 2 drops of soap, my tulle to wet out with, some scissors and the sander (makes things so easy but see safety precautions at the end of this entry!)

Gather your materials -- in this case I have my fabric, my wool and the silk/ bamboo that I am adding on top.

I laid out the fabric then added the roving in bands (they started at about 1/2 inch wide -- I tugged on the wool to flatten it). I extended the roving past my edges to make the fringes. When I was done with the design, I added the decorative silk on top of the piece, then added wisps of wool on top to hold everything in place. When I was happy with the layout, I covered the design with tulle, and carefully wet out. Next I carefully blotted up the excess water and removed the tulle and covered the piece with plastic to sand.

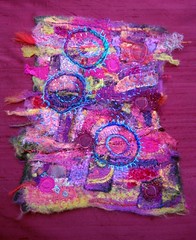
Here is the final result:


I thought it was cute! There are fringes around the neck which weren't quite dry, so they are hard to see. Didn't take too long!
Sanding precautions:
You need a finishing sander -- with no vacuuming attachment. There is a rubber base on the bottom and no sandpaper attached!
Plug the sander into a GFI outlet, or better yet, use a cordless sander. Stand on a rubber mat, wear rubber soled shoes and wear a rubber glove. I cover my pieces with plastic before sanding to further keep the water out of the sander. Many people have used a sander when felting but it does require that you use common sense and do not take chances!!!! If you are going to sand a lot you need to wear earplugs and a glove that protects you from the vibration such as a motorcycle glove. (I did mention this was a power tool, didn't I?)

Sunday, August 15, 2010

New Scarf Kits coming!

I've been busy working on some new colors -- this time in a light weight gauze with roving and silk/bamboo to felt on top. I am so excited with these colors and the whole look! Look for them on my website soon!

Monday, August 2, 2010

New Nuno -- Habotai Scarf with Self Fringes

A customer sent me a photo last week of a scarf she had seen and I just had to try it. (Thank you Julia!) It took two tries, but I think I got it! Here is the finished product -- it is a habotai scarf with self fringes. Very cute!

The main trick to this scarf was getting the fringes cut so they didn't look awkward. In my first attempt I cut the fringes in an angular manner at the top. The finished piece was spikey and not attractive. So I tried again, this time curving the top area. That worked! I made sure that the roving covered and extended past the edges of my fringed ends.

I also pushed the roving apart in several areas in the body of the scarf to allow some change in texture on the silk side when finished. You can see that in the second picture.

I wet out and sanded my piece to finish. Does anyone want to learn about using the sander? Leave me a comment here!

Cheers you guys. This was fun! Oh, and this is the canyon fabric with the purple roving. Sometimes I forget these things, sorry!

Sunday, July 18, 2010

Tutorial -- Felt Cords

Sorry to be slow -- I have had lots on my plate these last couple of weeks! Here is the tutorial for the strap for the purse I made (see http://learnedlately.blogspot.com/2010/07/hand-needle-feltingwet-felting-tutorial.html)


Here's how to make the cord:


For a thin cord -- pull strips of roving about 1/2 inch wide X the length of roving you are working with (doesn't matter how long it is). Overlap the pieces to get a cord length of about 30 to 40% longer than the final length you desire. Make sure the wool is as uniform in size down the length of the cord as you can get it. Add extra wool if the wool is thin in places.
I like to needle felt my roving pieces together to start. You can also dry felt the pieces together by rolling them in your hands. I added a bit of silk hankie to mine and needle felted it in. I rolled the piece between my palms up and down the cord.

Begin to wet felt by adding hot soapy water to the wool. Roll the cord with the palm of your hand against the bamboo or bubble wrap you use to wet felt. Roll up and down the length of the piece. When the cord begins to have some form, take it to your hot water source and get it very hot and throw it against a hard surface. Throw about 20 times. The cord will get uneven, but take it back to the mat and roll it again to smooth it out. It will take about 3 passes of throwing and rolling to get the cord firm enough to be a purse strap. Tug on the strap to make sure it is firm before you decide you are finished!

Sunday, July 11, 2010

More Everything kit ideas

Joggles has some wonderful things -- I especially love their on-line classes. Here is a link to some things Barbara has made with felt -- might be some new ideas here! http://www.joggles.com/woolfeltprojects.htm. Check out all of her wonderful classes and things for sale while you are there!

Sunday, July 4, 2010

Hand Needle Felting/Wet Felting Tutorial

I've finally gotten this done for you guys! I am making an iPod sized bag or it could easily be a glasses case if you don't include the strap. Hang in there with me while I go through this and be sure to ask if you have any questions!

Step 1 -- Gather your tools


You will need at least one felting needle (size 38 to 40) and a piece of high density foam -- I like to use the Clover Pen Style needle felting tool with 3 fine needles (see picture--you can get this at almost any craft store) and my foam came from JoAnn's -- it measures 11 X 11". Later on you will need wet felting tools (see step 6 below and the instruction page of my website http://www.suzannemorgan.com/instructions).

Step 2 -- Gather your materials and begin
I created this using one of my everything kits. (Here is a link to my ETSY shop http://www.etsy.com/shop/nunofeltingsupplies or see my website to see all of the colors the kits come in or if you want to gather your own materials -- there is a list of what is in the everything kits on the everything kits page http://www.suzannemorgan.com/everything_kits). I folded the prefelt in half so it would be sturdy enough to be a purse, shingled on another layer of matching roving (pull out and overlap small sections of roving so they look like roof tiles). I lightly needle felted everything together.


Step 3 -- Add surface decoration
I started adding the silk in a diagonal pattern across the bag. You can create whatever design you want! Just know that the process of felting will tend to create organic designs and the silk will bubble up and shrink as you needle felt it in place. I started with small strips of silk (either cut or torn from the larger pieces), laid them down and needle felted them in place. I also used thin strips of roving and placed them between 2 pieces of silk or used them to add to the design. After the pieces of silk were down I started filling in the design with edges cut from the silk hankie and perhaps small pieces of the yarns. I always add small strips of velvet and make sure I use plenty of roving around them and needle felt them in well. The velvet is dense and hard to felt in. To finish, I always add tiny wisps of wool on top of the silk and lightly needle in place.


Step 4 -- Evaluate the design
The piece can be lifted off of the foam slowly. I folded mine in it's intended shape to see how I liked my design. I ended up playing with my focal point -- removing some of the silk I had placed here and creating a flower shape instead. (see pictures in step 5) When you needle felt this way the designs can be moved until you wet felt them.

Note -- I also added a few lines of machine stitching randomly through the design. This is purely optional and will not have a great deal of effect on your final outcome unless you use a highly decorative thread.

Step 5 -- Get ready to wet felt
Since this is going to be a purse or eyeglass case, I needed a resist to put in between the layers. I cut a piece of a large zip lock bag to fit inside the felt allowing about 1/2 inch of the felt to touch on the two long sides and the bottom of the bag. I closed the bag around the resist, allowing it to stick out of the top of the bag and needle felted along the side and bottom to begin to attach the front and back.


Step 6 -- Wet Felt
Get out your wet felting tools, including a small bamboo placemat or bubble wrap, 2 pieces of tulle and a scrunched grocery bag. Go through the 3 steps of wet felting (see the instruction page of my website). The felting goes very fast as the needles have started the process. When you are at the final stage of fulling or shrinking the piece, consider the size you would like the purse to be when finished and stretch the purse into that shape as you go along. The felt should be pretty dense or firm for this piece. My finished piece measures about 4" wide X 6.5" inches tall. I also removed the resist after about one pass of fulling as the wool had started to shrink and the resist was in the way.

Here is a picture after the purse is dry and the handle is attached. The surface is very textural and the felt is very firm. I made some matching felted beads and included a few glass beads. Voila! About a 2 hour project! Looks just perfect for an iPhone or a droid!

Next up: I will teach you how to make the rope to use for a strap. There are many ways to create a strap -- you may have your own!

Wednesday, June 23, 2010

Fun Summer Class

Last week I helped teach a teen camp at the Craft Guild of Dallas. The class was called "Bag it Up" -- a week of making exciting new purses. There were 4 very talented young ladies in the class. My classes were on making a felted ipod or phone bag (more on this later -- they were so cute and I want to show you guys how we did it). We also made "fabric paper" purses. This purse idea came from the book "Stitch Alchemy". Basically you create your fabric paper by starting with muslin, then gluing on tissue paper and any other kinds of paper you might like. We also used some of my lightweight silks. Then painted, stamped, journaled on -- whatever! This is a good summer project as it is very freeform and fun.
These are the fabric paper purses before the girls added more embellishments:

Here are the girls with their finished purses:


Wednesday, June 16, 2010

Great Shibori Class

I attended a fun class in San Antonio with internationally known shibori artist Doshi and the San Antonio Fiber Arts group. (www.doshifiberart.com) If you haven't encountered her work or shibori in general, it is so amazing. Basically the fabric is tied or clamped to create ornate patterns then bound using fairly fine string, and dyed. The string or clamps and the folds of the fabric form resists and pattern the fabric. The origins of Shibori come from century old textile traditions from Japan and Africa.
Here is one new shibori technique I learned: pleat a light weight piece of silk up around a rope -- the rope should be about 1" in diameter. Wrap a piece of string or thread around the silk to bind it to the rope (you end up with sort of a tube around the rope). Die with either MX dyes or acid dyes.
Here is a picture of a piece of fabric created with this technique:


Can you see the pleat lines?
Also, a great book on the subject is "Shibori" by Karen Britto.

Thursday, June 10, 2010

Beautiful Work!

I've had the privilege of having Jane LaFazio use one of my "everything kits" to create a finished piece. She will be teaching a tutorial on this process next week (June 16) so watch her blog!

Here is the link and a picture of the piece she created:


Isn't it beautiful?

I will have some new kit colors over the next few weeks as I start carrying the prefelts and rovings as separate items.

Tuesday, May 25, 2010

What have I learned lately?

Sometimes I forget to write about things I am learning. I am reflective by nature and always trying to figure things out about the world and the people I am surrounded by. Sometimes I forget to write those things down.
So here are some random thoughts:

I just love nurturing creativity and being around creative people. I really do think allowing ourselves to create is healing at such a deep level. Also allowing our work just to be how it is that day is a great thing. (Sometimes we like what we see and some times we don't -- kind of like life!) Being able to embrace all of those days is wonderful...

Teenagers are supposed to go to college or otherwise be on their own!

You cannot please everyone -- I have tried all of my life to make others happy and the undoing of that is a challenge. But I am learning that life will go on even if it is sometimes unsettled...

Oh, and here are some tree pieces I've been working on. (Remember my leaning tree?) The first one looked OK before felting -- I was doing a demo and didn't have all of my stash to pull from. I didn't like it later. The second one I did after seeing the work of Margo Duke at the Martha Pullen show last week. Margo is inspirational to be sure! Here is a link to Margo's blog so you can see some of the amazing things she creates http://hermajestymargo.blogspot.com. I think the second piece has promise...
So, like the tree, I've learned that we can grow even through the unsettled times when we feel uprooted. Not easy. but can be done!

More Fun at the Creative Arts Center


Very fun group at the Creative Arts Center!! Nurturing Creativity is strong there-- take a class if you can!

Sunday, May 2, 2010

Class at Fancy Fibers


We had a great time at Mary Berry's Fancy Fiber Farm yesterday. Mary lives in Farmersville which is about 25 miles east of McKinney. She has angora rabbits and goats, alpacas and sheep who provide beautiful fibers which Mary dyes and sells. Her website is www.fancyfibers.com. Good for you Mary for making your dreams come true!

Everyone had fun making their felted creations. Here are the pictures of the class:

Thank you guys for being so much fun!

Tuesday, April 20, 2010

New Everything Kits

Yesterday wasn't a great day -- I've spent a lot of money on my house lately and yesterday I had to replace one of the A/C components. As one friend said, it's only time and money -- no one died. (I try to remember to keep that perspective).
The day got brighter when a package arrived from Gale of Gale's Art. (Here is a link to her ETSY shop http://www.etsy.com/shop/galesart) Gale made some custom hand dyed hankie and roving for me for my new color kits. I'm adding more colors of fabric and some designer wool yarns. Gorgeous things! So here is the first of the kits:
It's amazing how playing with things we love can make us feel better. I know the color just makes me happy! Look for it on my website.
Here's another picture of my new favorite tree:

More work with this soon! Cheers and happy earth day. Let's all join in and try to change just one thing to help the earth.

Thursday, April 8, 2010

More on Personal Symbols

I posted an earlier photo of this group of personal symbols -- here is the final version:


Many many thanks to contributing artists Marjorie Nichols, Kimberly Morris and Rhonda Douglass who helped with the mounting. This piece is hanging at the Creative Arts Center at the moment. All three of these woman can be found on Facebook. Kim and Marjorie are at the Main Street Fort Worth Arts Festival this weekend. Booths 352 and 364.

Rhonda helped me create this clever mounting which started with a metal barbecue grill from Home Depot. Each piece was mounted on foam core board and attached with metal tape. The images are interchangeable.

On my walk the other morning I spotted a tree that spoke volumes to me. It was an old tree that had been partially uprooted by the winds. Yet it lives on and is beginning to bloom. That old tree spoke to me about how life can uproot us, but yet we go on. My first pictures did no justice to the tree. I will continue to try to capture the essence of this tree and work with it as a personal symbol. The best picture was of the bare roots -- so torn, yet they continue to support the tree!